I have been getting a lot of request on how I colored in my stamping, so I decided to make this post for you guys! Remember I am not a professional just a gal who loves stamping. I want to help you guys achieve beautiful stamping too.
First of all I learn this technique on Instagram from @maespiritu_artofnail and I credit her completely! She creates wonderful nail stamping manicures. This is her Blog where she explain how to achieve Advance Nail Stamping. Please follow her for nail stamping inspiration.
Here are the steps in achieving the Advance Stamping technique. Remember to paint all your nails first before doing the following steps:
*Please remember to do these steps per nail.
Hola, He estado recibiendo muchas peticiónes en como lograr el estampado avanzado, por eso decidí escribir este post. Recuerda que no soy una profesional solo una chica que le encanta el estampado de uñas. Yo quiero ayudarlos a lograr esta técnica.
Primero que nada, quiero decir y dar crédito completamente a una chica maravillosa que conocí en Instagram. Su nombre y Instagram es @maespiritu_artofnail . Ella hace un estampado hermoso! Esta técnica lo aprendí de ella. Aquí se encuentra su blog de como lograr el estampado avanzado. Favor de seguirla en su blog y Instagram para más inspiration!
Aquí están los pasos de como lograr esta técnica. Recuerda que debes de pintar todas tus uñas antes de comenzar estos pasos.
*Recuerda hacer estos pasos 1 uña a la vez.
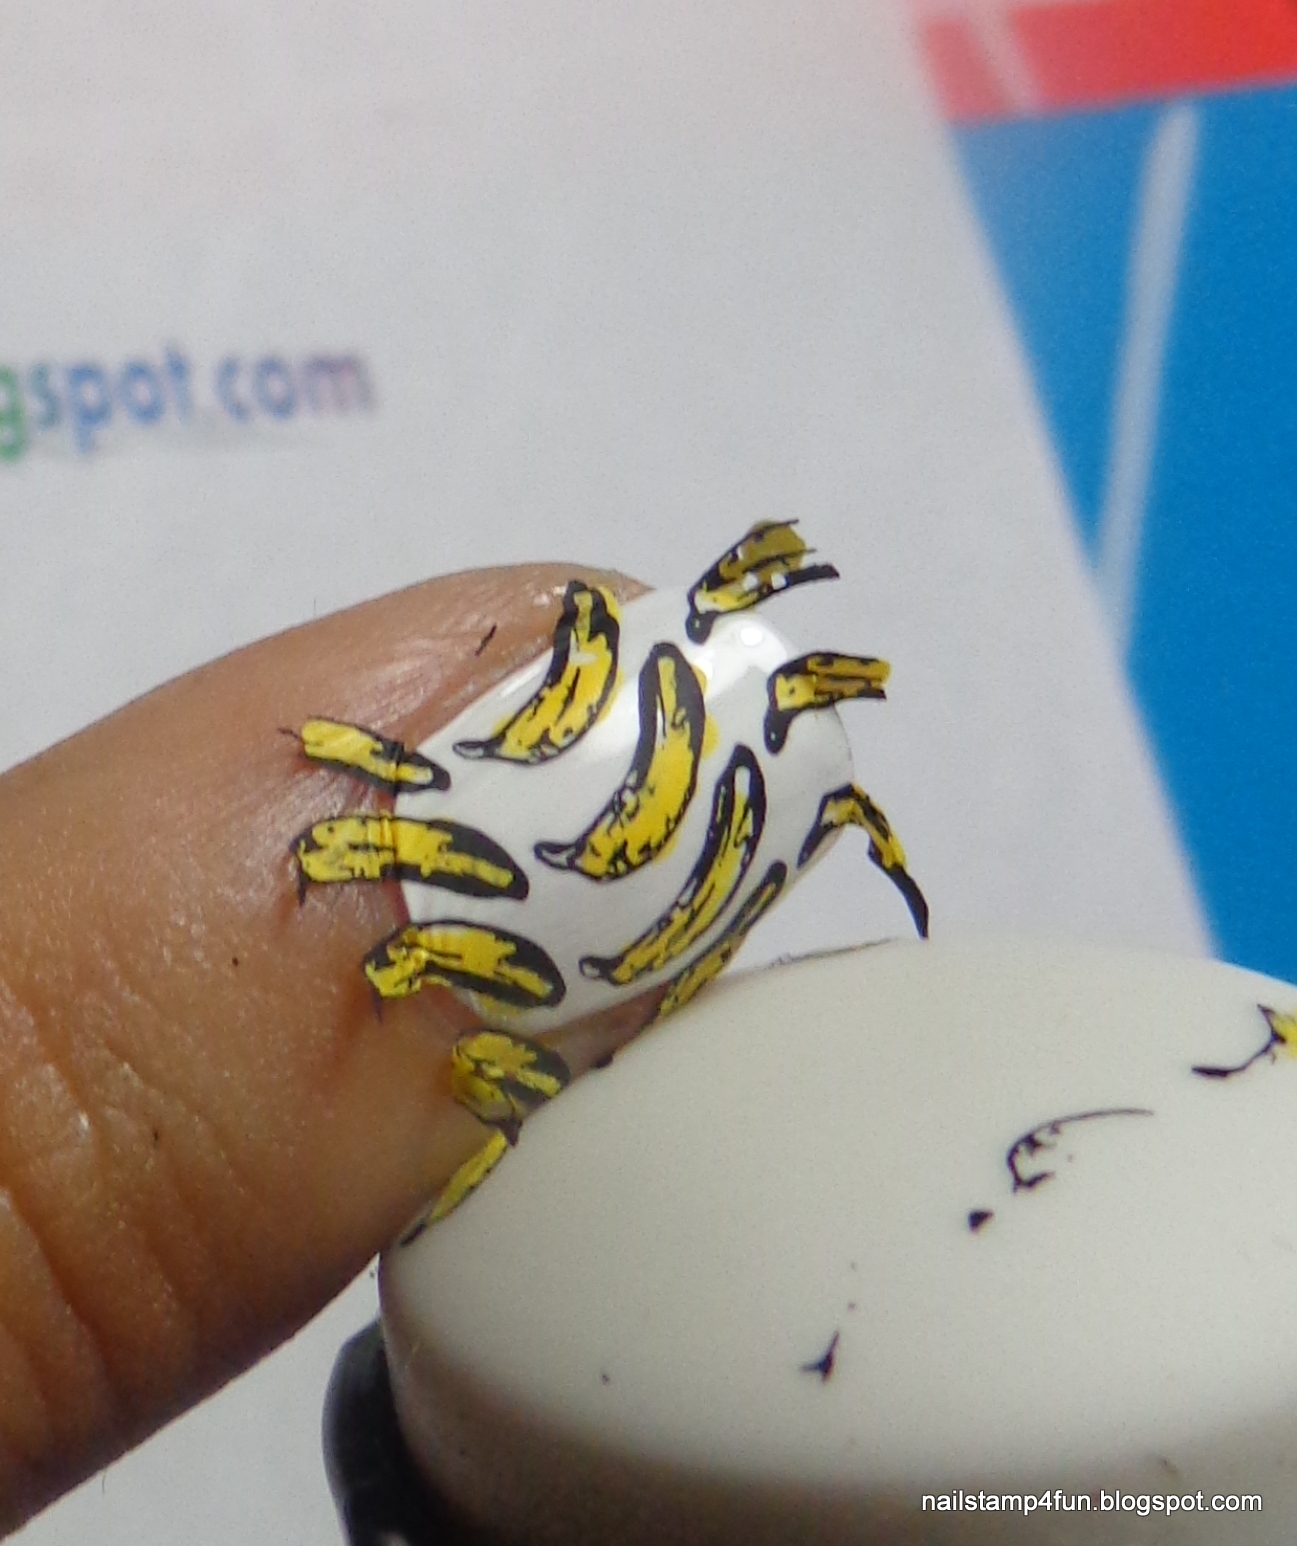
Step 1:
I used Cheeky plate ch42 and chose the banana design. Not all images work for this technique you need a design that you can fill in with color, just as you would a coloring book. I used Konad Black special polish.
Paso 1:
Yo use la placa de Cheeky ch42 y para esta demostración use los guineos. No todas las imágenes funcionan. Necesitas un imagen que puedas llenar con color. Usé el esmalte de Konad en negro.

This is the fun part, time to color in your stamping. I used Sally Hansen lightening and a dotting tool. In this step you can be creative. Add the colors you wish, you can even make a banana rainbow!
Paso 2:
Esté paso es super divertido. Ahora llenas tu imagen de color! Usé Sally Hansen Lightening y un dotting tool. Añades los colores que más te gusten. Puedes crear hasta un arco iris de guineos!

*Please remember to do this steps per nail. Do not apply the top coat until your ready to apply your stamping.
This is the one of the Tricky parts & most important. Apply a Top Coat, I used Seche Vite. This will act like a bond. Your image will stick to it, BUT you must wait till its tacky. It cannot be too wet nor dry. It will take you time to learn when to apply, but you will get it. Practice makes perfect.
Paso 3:
*Recuerda hacer estos paso 1 uña a la vez. No apliques la capa final hasta que estés listo para aplicar tu estampado.
Este paso es un poco complicado pero es el más importante. Vamos a aplicar una capa final, yo usé Seche Vite. Esté va actuar como una unión, el que va ayudar pegar tu diseño a la uña. Debes esperar que el esmalte este un poco pegajosa. El esmalte no puede estar ni muy mojado ni seco. Te va tomar tiempo aprender cuando es el momento preciso de aplicar el estampado pero no te preocupes, recuerda que la practica hace la perfección!

Step 4:
Remember that your nail image on the stamper must be dry and your top coat tacky. If it is too wet it will smudge and if its too dry you won't be able to stick the image on your nail.
If everything is ready, then here we go! :)
As you see Below I added a lot of pics. I am trying to demonstrate to you the way I roll my stamper on my nails. I roll the stamper very softly on the nail one side to the other.
Paso 4:Recuerda que tu diseño en el estampador deber estar seco y tu capa final debe estar un poco pegajoso. Ni muy mojado ni seco. Si esta muy mojado dañas tu diseño y si esta seco no pega.
Ahora si todo esta listo, aquí vamos!
Como verás bajé muchas fotos. Trato de demostrar la manera en que aplique el estampado. Tomo el estampador y de un lado a otro aplico el imagen lentamente, es rodar el estampador de un lado a otro. Recuerda hacer lo lentamente y suavemente.


Step 5:
Your nail should look like the picture below. Using my fingers, I gently press on the images so they apply completely on the nail. I take off the excess using a small detail brush with acetone. I use the $1 Elf professional concealer Brush.
Paso 5:
Tu uña deben lucir como la foto de abajo. Con tus dedos suavemente presionas el imagen sobre tu uña para se adhiera completamente a el. El resto lo puedes eliminar con un pincel pequeño con acetona. Yo uso el pincel de Elf profesional concealer que solamente cuesta un dólar.
Step 6: Final Step
Seal in your design with your favorite Top Coat. I used Seche Vite top coat.
Paso 6:Ahora sellas tu diseño con tu capa final favorito. Yo uso Seche Vite.

And there you go!! You now have a yummy banana nail! Repeat all these step on each nail.
As you see the Advance Stamping method seems difficult, but remember practice makes perfect! Never give up! You too can achieve this method!! Have Fun!!
Ahí lo tienes amigos! Ahora tienes una sabrosas uña de guineos! Repita todos los pasos para cada uña.
Como vez parece difícil este método pero con practica lo lograras! Nunca deben rendirse! Espero que hayan disfrutado!
Hasta luego!


I like it. Great post-
ReplyDeletehttp://www.fashiondenis.com/
Thank you so much!
DeleteThis is super cute!
ReplyDeletees muy buena la tecnica!! te quedo perfecta
ReplyDeleteEstupendo, me encantó!
ReplyDeleteThis looks so fun. Wouldn't it be easier to paint the design with paints, sharpie's are polish after it's been applied to the nail? Just wondering..I really need to try this out. I love to stamp..Thanks for showing this..Loved it!!!!
ReplyDeleteGreat tutorial! i found u randomly on youtube, congrats on the video and i can't wait to try this technique!
ReplyDeleteCool nail designs I really like
ReplyDelete