The 31 Day Challenge: Day 10, 11, 12 & 13

Friday, September 13, 2013

Hola!

I hope your having a wonderful day!  Sorry that I have been late on posting my manicures here on my blog.  Remember you can find me on Instagram.  I am more active there than any other social media place.

Here are my pics for Day 10, 11, 12 & 13.  I hope you enjoy!

Hola!

Feliz día amigos!  Siento haber estado tarde en postear mis fotos aquí en mi blog.  Recuerda que me puedes seguir en Instagram, estoy mas activa ahí. 

Aquí están mis manicuras de los días 10, 11, 12 y 13.  Espero que les gusten.

Day 10: Gradient Nails

Colors & Tools:
1.  Bettina Glamour Celebrate (Gold)
2.  Bettina Kiwi
3.  Bettina Mandarin
4.  Mash stamping plate 42
5.  Konad Black Special Polish
6.  Seche Vite Top Coat


Day 11:  Polka Dots

Colors & Tools:
1.  WetnWild Megalast Through The Grapevine
2.  Bundle Monster stamping plate BM322
4.  Konad Black special polish
5.  Sinful Colors Snow Me White
6.  Seche Vite top coat


Day 12:  Stripes

Colors & Tools:
1.  WetnWild I Need A Refresh-mint
2.  Mash40 stamping plate
3.  HD- Holiday plate by Bunny Nails
4.  Stamping polish:  Sinful Colors Snow me White & Sally Hansen Silver Sweep
5.  Seche Vite Top Coat


Day 13:  Animal Print

Colors & Tools:
1.  China Glaze Texture Bump In The Night
2.  Stamping plate:  Mash41
3.  Stamping Color:  Sinful Colors Snow Me White
4. No top coat


Hasta Luego!

The 31 Day Challenge: Day 9 Rainbow Nails

Monday, September 9, 2013

Hola!

Here are my Rainbow Nails for todays challenge.  I had so much fun doing this manicure.  It was very difficult to keep the lines straight because I have very shaky hands, but I did it!  Yay!  I really love the way these nails look, they make me happy. :)  It makes me sad to think that I will have to change them tomorrow. 

Hola!
Estas son mis uñas de arco Isis para el reto de hoy.  Fue muy divertido hacer esta manicura.  Fue muy difícil mantener las líneas derechas, pero lo hice! Yaahoo! :) Me encanta como se ven y me hacen muy feliz.  Es triste pensar que mañana tendré que cambiar las.


Steps:

1.  For this mani I used:
      a.  Red:  Wet n Wild Megalast in I Red a Good Book.
      b.  Orange:  Zoya Arizona
      c.  Yellow:  Zoya Pippa
      d.  Green:  Zoya Hunter
      e.  Blue:  Zoya Song
      f.  Dark Purple:  China Glaze Creative Fantasy
      g. Lighter Purple:  China Glaze Grape Pop
2.  I used a detail nail art brush for the stripes.
3.  After I applied the stripes of color I applied a coat of Seche Vite top coat to smooth out the surface for my stamping.
4.  I used Pueen 13 stamping plate and Konad Black special polish
5.  Sealed it in with my favorite top coat Seche Vite.

I hope you enjoyed my colorful mani.  Take care.

Pasos:
1.  Para esta manicura usé los siguientes colores:
      a.  Rojo:  Wet n Wild Megalast in I Red a Good Book.
      b.  Anaranjado:  Zoya Arizona
      c.  Amarillo:  Zoya Pippa
      d.  Verde:  Zoya Hunter
      e.  Azul:  Zoya Song
      f.  Violeta oscuro:  China Glaze Creative Fantasy
      g. Violeta claro:  China Glaze Grape Pop
2.  Usé un pincel para las líneas.
3.  Luego aplique una capa de Seche Vite para dejar un base liso para el estampado.
4.  Use la placa Pueen 13 y Konad Negro
5.  Termine con mi capa final favorito Seche Vite.

Espero que le haya gustado mi manicura.  Cuidensen.


Hasta Luego! 


The 31 Day Challenge: Day 8 Metallic Nails

Sunday, September 8, 2013

Hola!

Metallic Nails is today's challenge.  I really like the look of metallic polishes.  Here is my manicure called Metallic Notes.

Hola!
El reto de hoy son uñas metálicas.  Me encanta el "look" de los esmaltes metálicos.  Este es mi manicura de hoy se llama "Metallic Notes"


Colors used:

1.  I painted my nails with Orly Rage.
2.  I used Pueen stamping plate 47.
3.  Konad Black special polish.
4.  Seche Vite top coat.

I hope you enjoyed my manicure.

Espero que les haya gustado!

Hasta luego!

The 31 Day Challenge: Day 7 B&W Nails

Friday, September 6, 2013

Hola!!

Introducing my nails for Day 7 of #31DC2013!  Black & White Nails.  For this mani I decided to recreate a mani I did a few months ago (Which is also posted below), but with a twist.  Instead of White as my Base and Black for my stamping I did the opposite.  I hope you enjoy this simple B&W manicure.

Hola!
Presentando mis uña para el séptimo Día del reto #31DC2013.  El tema de hoy es Uñas Negras y Blancas.  Para este reto decidí recrear una manicura que hice hace unos meses atrás (lo cual veras abajo), pero en vez de tener la base blanca y el estampado negro hize lo opuesto.  Espero le les gusten mi "B&W mani".


Steps:

1.  I applied Orly Liquid Vinyl to all my nails.
2.  I used Pueen stamping plate 44.
3.  Konad White special polish for my stamping.
4.  Seche Vite top coat.

This is another quick and simple manicure.  I posted the picture of this same exact manicure below, but I inverted the colors. I think it looks better with white as the base and black stamping.  What do you think?

Esté es otra manicura fácil para hacer.  Abajo esta la misma manicura pero con los colores intercambiados.  Creo que se ve mejor con la base blanca y el estampado negro.  ¿Qué opinas?

Hasta luego!


The 31 Day Challenge: Day 6 Violet Nails

Hola!

I am having so much fun with this challenge.  Here is my mani for day 6:

Hola!

De verdad que es súper divertido es este reto!  Aquí está mi manicura del sexto día:


I used:

1.  Color Club Eternal Bliss on all my nails except my ring finger.
2.  On my ring finger I applied Sinful Colors Black on Black.
3.  I used HD-B holiday plate by Bunny Nails.
4.  For stamping I used Konad Black, Sally Hansen Silver Sweep, CC Eternal Bliss with the advance stamping technique .
5.  Seche Vite Top Coat.

I really love the way it turned out!  They are gorgeous in the Sun.  What do you think?  Do you like them, please let me know in the comments below. I hope you enjoyed my post.

A mi me gusto mucho esta manicura, es muy fácil para hacer y lucen hermosas en el Sol.  ¿Y tu, qué opinas? Déjame saber en los comentarios.   Espero que les haya gustado!

Hasta luego!

Advance Stamping Tips

Thursday, September 5, 2013

Hola!

I have been getting a lot of request on how I colored in my stamping, so I decided to make this post for you guys!  Remember I am not a professional just a gal who loves stamping.  I want to help you guys achieve beautiful stamping too. 

First of all I learn this technique on Instagram from @maespiritu_artofnail and I credit her completely!  She creates wonderful nail stamping manicures.  This is her Blog where she explain how to achieve Advance Nail Stamping.  Please follow her for nail stamping inspiration.

Here are the steps in achieving the Advance Stamping technique.  Remember to paint all your nails first before doing the following steps:

*Please remember to do these steps per nail. 

Hola, He estado recibiendo muchas peticiónes en como lograr el estampado avanzado, por eso decidí escribir este post. Recuerda que no soy una profesional solo una chica que le encanta el estampado de uñas.  Yo quiero ayudarlos a lograr esta técnica.
 
Primero que nada, quiero decir y dar crédito completamente a una chica maravillosa que conocí en Instagram.  Su nombre y Instagram es @maespiritu_artofnail .  Ella hace un estampado hermoso!  Esta técnica lo aprendí de ella.  Aquí se encuentra su blog de como lograr el estampado avanzado.  Favor de seguirla en su blog y Instagram para más inspiration!
 
Aquí están los pasos de como lograr esta técnica.  Recuerda que debes de pintar todas tus uñas antes de comenzar estos pasos.
 
*Recuerda hacer estos pasos 1 uña a la vez.

Step 1:

I used Cheeky plate ch42 and chose the banana design.  Not all images work for this technique you need a design that you can fill in with color, just as you would a coloring book.  I used Konad Black special polish.

Paso 1:

Yo use la placa de Cheeky ch42 y para esta demostración use los guineos.  No todas las imágenes funcionan.  Necesitas un imagen que puedas llenar con color.  Usé el esmalte de Konad en negro.

Step 2:

 This is the fun part, time to color in your stamping. I used Sally Hansen lightening and a dotting tool.  In this step you can be creative.  Add the colors you wish, you can even make a banana rainbow!

Paso 2:

Esté paso es super divertido.  Ahora llenas tu imagen de color!  Usé Sally Hansen Lightening y un dotting tool.  Añades los colores que más te gusten.  Puedes crear hasta un arco iris de guineos!

Step 3:

*Please remember to do this steps per nail.  Do not apply the top coat until your ready to apply your stamping.

This is the one of the Tricky parts & most important.   Apply a Top Coat, I used Seche Vite.  This will act like a bond.  Your image will stick to it, BUT you must wait till its tacky.  It cannot be too wet nor dry.  It will take you time to learn when to apply, but you will get it.  Practice makes perfect.

Paso 3:

*Recuerda hacer estos paso 1 uña a la vez.  No apliques la capa final hasta que estés listo para aplicar tu estampado. 

Este paso es un poco complicado pero es el más importante.  Vamos a aplicar una capa final, yo usé Seche Vite.  Esté va actuar como una unión, el que va ayudar pegar tu diseño a la uña.  Debes esperar que el esmalte este un poco pegajosa.  El esmalte no puede estar ni muy mojado ni seco.  Te va tomar tiempo aprender cuando es el momento preciso de aplicar el estampado pero no te preocupes, recuerda que la practica hace la perfección!

 
Step 4:
 
Remember that your nail image on the stamper must be dry and your top coat tacky.  If it is too wet it will smudge and if its too dry you won't be able to stick the image on your nail. 
 
If everything is ready, then here we go! :)
 
 
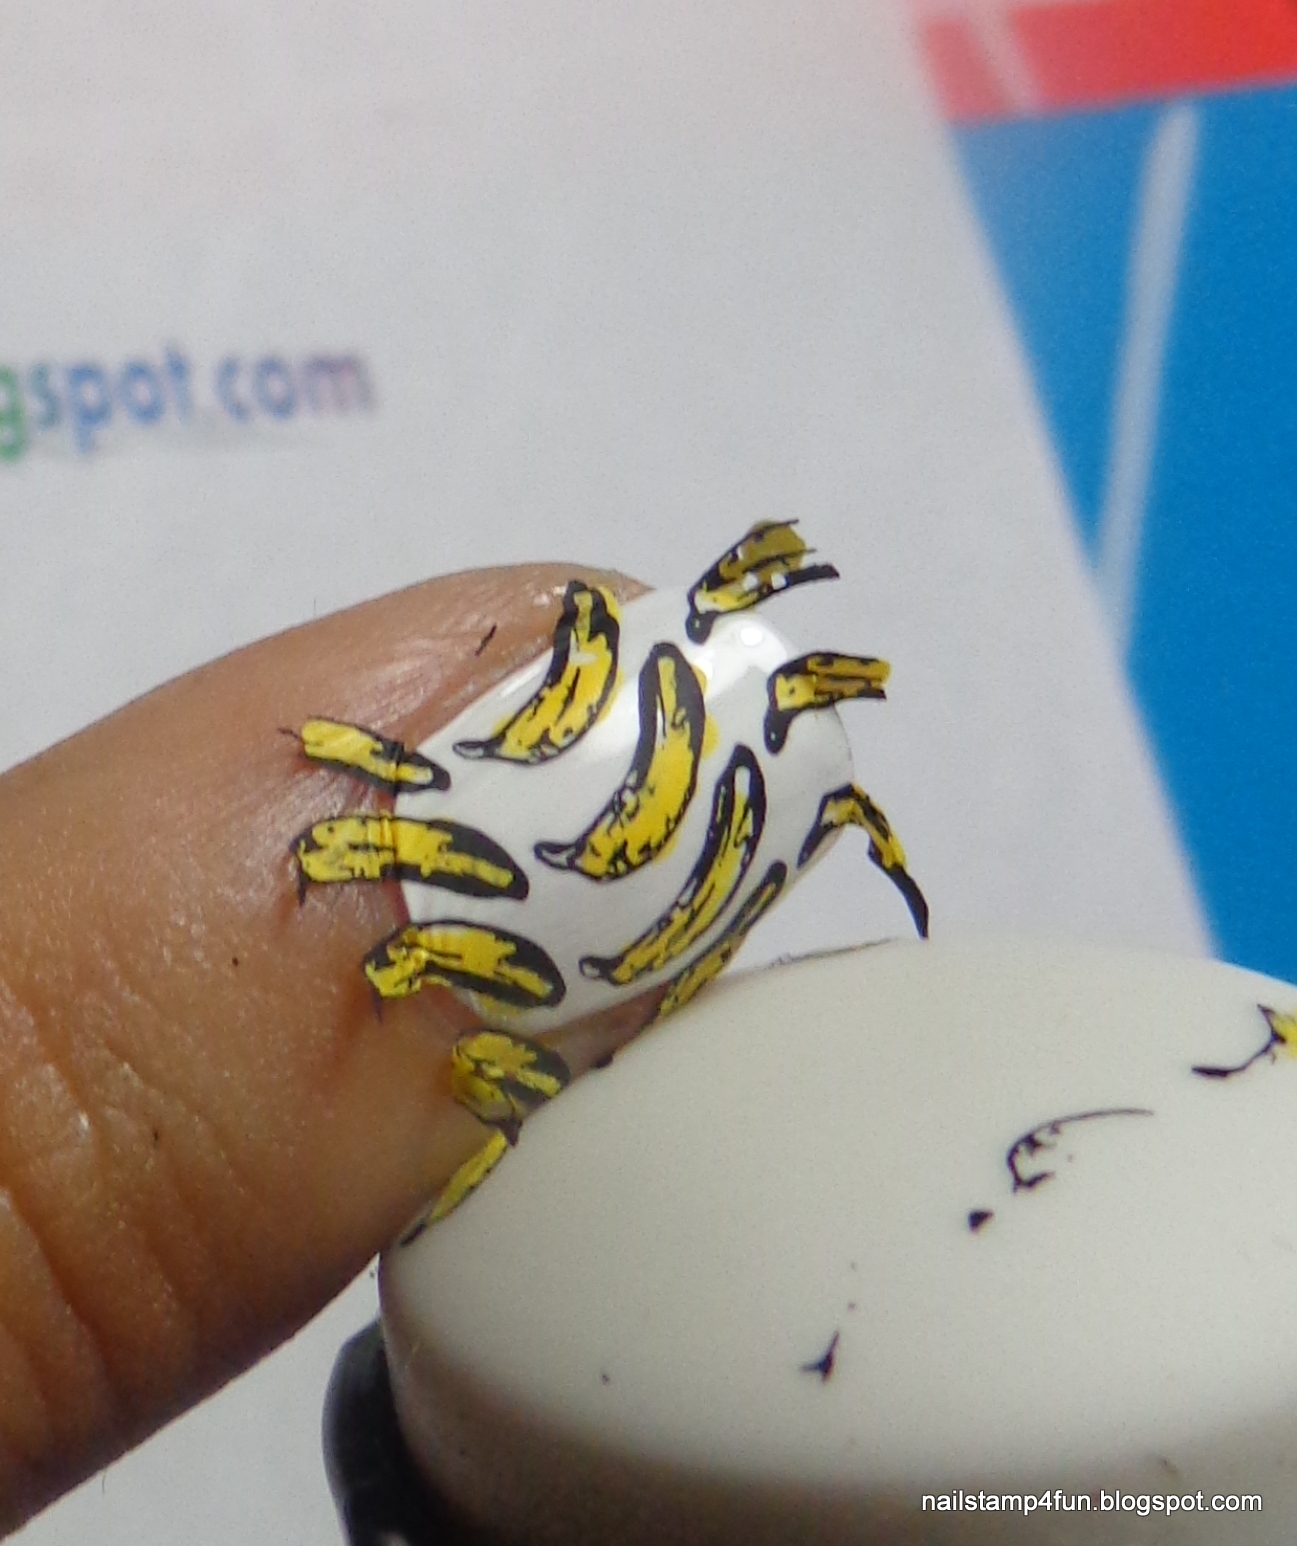
As you see Below I added a lot of pics.  I am trying to demonstrate to you the way I roll my stamper on my nails.  I roll the stamper very softly on the nail one side to the other.
 

Paso 4:

Recuerda que tu diseño en el estampador deber estar seco y tu capa final debe estar un poco pegajoso.  Ni muy mojado ni seco.  Si esta muy mojado dañas tu diseño y si esta seco no pega.

Ahora si todo esta listo, aquí vamos!

Como verás bajé muchas fotos.  Trato de demostrar la manera en que aplique el estampado.  Tomo el estampador y de un lado a otro aplico el imagen lentamente, es rodar el estampador de un lado a otro.  Recuerda hacer lo lentamente y suavemente.


Step 5:
 
Your nail should look like the picture below.  Using my fingers, I gently press on the images so they apply completely on the nail.  I take off the excess using a small detail brush with acetone.  I use the $1 Elf professional concealer Brush.
 
Paso 5:
 
Tu uña deben lucir como la foto de abajo.  Con tus dedos suavemente presionas el imagen sobre tu uña para se adhiera completamente a el.  El resto lo puedes eliminar con un pincel pequeño con acetona.  Yo uso el pincel de Elf profesional concealer que solamente cuesta un dólar. 


Step 6: Final Step
 
Seal in your design with your favorite Top Coat.  I used Seche Vite top coat. 
 

Paso 6:

Ahora sellas tu diseño con tu capa final favorito.  Yo uso Seche Vite.


And there you go!! You now have a yummy banana nail!  Repeat all these step on each nail. 
 
As you see the Advance Stamping method seems difficult, but remember practice makes perfect!  Never give up! You too can achieve this method!!  Have Fun!!
 
Ahí lo tienes amigos!  Ahora tienes una sabrosas uña de guineos!  Repita todos los pasos para cada uña.
 
Como vez parece difícil este método pero con practica lo lograras!  Nunca deben rendirse!  Espero que hayan disfrutado!
 
 
Hasta luego!


The 31 Day Challenge: Day 5 Blue Nails

Hola!

Here are my blue nails for the challenge.  I posted them around 12:40 a.m.  on my Instagram. 

Aqui estan mis uñas del Día 5 del reto.  El reto de hoy es uñas azules. 


Polishes & Stamping plate used:

1.  I applied Orly Skinny Dip as my base color.
2.  I applied Polish Addict Nail Color Dr. Franken Glitter on my index finger & pinky.
3.  I used Cheeky stamping plate ch44.
4.  Colors used for advance nail stamping:  Konad Black, Sally Hansen Lightening and Sinful Colors Snow me White.
5.  Seche Vite Top Coat.

I hope you enjoyed my mani.

Espero que les haya gustado.

Hasta luego amigos!
 
FREE BLOGGER TEMPLATE BY DESIGNER BLOGS