Showing posts with label Pueen Stamping Plates. Show all posts

Quick Red Lace Nails: Using Pueen 27

Saturday, August 23, 2014

¡Hola!

I hope you are having a wonderful day!

Here are my Red Lace Nails:


It's a quick and easy look to create.  You can recreate this look with any beautiful lace pattern and you can even change the color!  I hope you guys enjoy the video:


What did I use?
1.  Base Coat:  Duri Rejuvacote
2.  Top Coat:  Seche Vite
3.  WetnWild 2% Milk
4.  Konad Red
5.  Pueen plate 27

I hope you guys enjoy! Please Take Care & Happy Stamping!

Swanette

Mix & Match Manicure Using Pueen Encore Set

Wednesday, July 2, 2014

¡Hola!

Here is another manicure using Pueen Encore Set:


What did I use?

1.  Duri Rejuvacote for my base coat.
2.  China Glaze Flip Flop Fantasy for my base color
3.  Rica Whiteout Polish for my Ring Finger and Stamping
4.  Bundle Monster Black Polish
5.  Pueen SE02A for flower
6.  Pueen SE01A for ring finger
7.  Black White Stamper
8.  Seche Vite

Here is a quick stamping video on how I did them:


Where to buy Pueen? 
Amazon & their site

Where to buy Rica Nail polish in Whiteout?
Her etsy site.

Where to buy Bundle Monster Polish:
Their website.

I hope you enjoyed my video!

Happy Stamping!

Swanette

Peacock Nails Using The Pueen Encore Collection

Tuesday, July 1, 2014

¡Hola!

Here is the Peacock manicure that I posted on my Instagram yesterday:


They are very fun and easy to do!

This is what you need:

1.  Zoya Taylor for your base color
2.  Pueen SE03A
3.  China Glaze Scandalous Shenanigans
4.  China Glaze Con-fused?
5.  Maybelline Gold Bold
6.  Black & White Stamper
7.  Seche Vite

Here are the steps on how to create them.  Just watch my video:


I hope you enjoyed my tutorial!

Where can you purchase Pueen stamping plates?  On Amazon or on their site.

Happy Stamping!

Swanette

Pueen Cosmetics Encore Nail Stamping Set: YouTube Video Review.

Friday, June 27, 2014

¡Hola!

I just received my Pueen Cosmetics Encore nail stamping plate.  I am so happy!  It is really a beautiful set.  These plates were purchase by me, but I use a $20 gift card that I won on Pueen Cosmetics Instagram giveaway.  They were so kind to give a $20 gift card to everyone who entered their giveaway.  This set has four plates engraved on both sides.  They are currently selling for $24.99 on their website.


Here is my YouTube Video:


Feel free to skip to these areas of the video:

PREPARATION: 2:07
SEE EACH PLATE: 6:43
SEE SWATCHES: 7:22
FINAL THOUGHTS: 8:34

WHERE TO PURCHASE PUEEN PLATES:
Pueen Cosmetics site

SOON ON AMAZON: IN STOCK JULY 1, 2014
Amazon site

I will try to have pictures and swatches soon!

Please take care & Happy Stamping!

Swanette

Neon Nails Using Pueen 36

Tuesday, June 24, 2014

¡Hola!

I was recently ask to be apart of another beautiful collage with @Puertoriconailgirls.  We did Neon nails.  Here is the collage:
 They all came out beautiful! Of course all their beautiful nails where hand drawn.  Mines were the only one done with nail stamping.  I wish I had their talent.  Your welcome to check these fabulous ladies out.   💞@nailsbymae 💞 💞@verymariposa 💞 💞@adelislebron 💞 💞@cloerubi 💞 💞@simple_short_nails 💞 💞@playingwithnailpolish 💞 💞@jekelovepolish 💞 💞@naq57 💞


Here is my manicure:

What did I use?

1.  Duri Rejuvacote
2.  Sinful Colors Snow Me White
3.  Pueen 36
4.  Konad White
5.  China Glaze Shocking Pink
6.  China Glaze Orange Knockout
7.  Orly Skinny Dip
8.  Orly Glowstick
9.  Cosmetic Wedge Sponge
10.  Seche Vite Top Coat
11. Black & White Stamper
12.  Metal Stud
13.  Dotting Tool


Watch my video on how to create them:


Where to buy Pueen Plates?  Amazon, Ebay and their site.


I hope you guys enjoyed my video!
Happy Stamping!

Swanette


Learn how to stamp with two or more colors!

Wednesday, June 4, 2014

Hi!

I want to show you guys how to stamp with two colors.  Here is the mani I posted on my Instagram:


It's very easy to do, just watch my YouTube Video:


What did I use?

1.  Duri Rejuvacote
2.  Zoya Mitzi
3.  China Glaze Modify Me
4.  China Glaze Split Perso-nail-ity
5.  Sally Hansen Silver Sweep
6.  Seche Vite
7.  Black White Stamper
8.  Pueen 28
9.  Pueen 10

Where to purchase Pueen Plates:
http://pueencosmetics.com/ or Amazon or Ebay

I hope you enjoyed my video!

Take Care & Happy Stamping!

Swanette

The Baggie Method: Pueen plate 65

Sunday, March 30, 2014


¡Hola!

Here is my mani for Sundays Challenge I did this for the Facebook group:  Adventures In Stamping:


The challenge for today is to combine another technique with nail stamping, such as water marbling, gradient, etc.  I used the Baggie Method which I explain here.  The Baggie Method is similar to Saran Wrap Method the only this is that I use plastic grocery baggies. 

Here is my video on how to make this mani: 


What did I use?

1.  Duri Rejuvacote
2. China Glaze Kinetic Candy
3.  China Glaze Shocking Pink
4.  China Glaze White on White
5.  China Glaze Sweet hook
6.  China Glaze Virtual Violet
7.  Pueen Plate 65
8.  Seche Vite Top Coat
9.  Cut squares from a plastic Baggie

I hope you guys enjoy!

Happy Stamping!


Tutorial: Using Pueen 51

Thursday, February 27, 2014

¡Hola!

I wanted to share a tutorial with you guys! This is the mani I posted today on Instagram:


I used shades from The China Glaze Sea Goddess Collection and Pueen plate 51.  I hope you enjoy! ...Here we go!

What do you need?

1.  A Base Coat:  I used Duri Rejuvacote.
2.  China Glaze Sand Dolla Make You Holla
3.  China Glaze Wish On A Starfish
4.  China Glaze Shell We Dance?
5.  Pueen nail stamping plate:  Pueen 51
6.  Black stamping polish:  I used P&E Black Matte.
7.  Your favorite Top Coat:  I used Seche Vite


Steps:  

1.  Apply your favorite Base Coat.  I use Duri Rejuvacote as my base coat. 

2.  Using China Glaze Sand Dolla Make You Holla, apply only on the upper 1/3 of your nail.  I applied 3 thin coats. **Pay no attention to my half naked nails! lol


3.  Using China Glaze Wish on a Starfish, apply on the center of your nail.  Then with the brush gently apply a little of the pink over the white, this will create a gradient look without having to use a sponge.   I applied two coats.


4.  Using China Glaze Shell We Dance?, apply on the lower part of the nail.  Just as before, gently  apply a little of the dark pink over the lighter pink creating a gradient look.  I applied two coats.  It might look uneven but don't worry the top coat will help even it out. 


5.  Apply your favorite top coat.  I used Seche Vite.  This step is very important!  The top coat evens out the gradient and creates a smooth surface for nail stamping.  After applying wait till the nails are completely dry before going on to the next step.


6.  After your nails have dried, you can finally stamp! Yay!  I used Pueen 51 and P&E Black Matte.  


7.  Apply your favorite top coat, clean up your cuticles and your done! 


I hope you enjoyed!  If you recreate this mani, I would love to see it! Just tag me on Instagram! 


Happy Stamping!!

Swanette


Pueen Cosmetics 24B Stamping Buffet Collection

Monday, February 24, 2014

**Purchased by me
¡Hola!

I finally get to show you guys the new plates from Pueen Cosmetics .  They are called The 24B Stamping Buffet Collection.  I purchased them on Amazon, but you can also buy them on their site too.  This set has 24 fully etched plates.  They are so fun, you can stamp anywhere you want and the possibilities are endless.  This set also includes a handy storage case with your order. 

Here are the plates:


Here are some quick swatches:
I used the Black&White Stamper and Mash Black special polish.


Here are some mani's I post on my Instagram using this set:

 Pueen 70
I used the advance stamping technique.  I have an pictorial on my blog click here . 


Pueen 52
Colors:  FingerPaints Copy Cat and P&E Black Matte.


Pueen 63
 Colors: Orly Razzle & P&E black matte. 

 Pueen 72
Colors Zoya Chantal & Konad White.


I really like these plates.  I love that they are fully etched, they each look like a work of art.  You can stamp where ever you want and create different manicures with them.  Each plate is well etched.  I had no problem picking up the image.  I did find that some images were very big, so it can be frustrating for a person with short nails.  For example:  Pueen: 70 ( look above at the mani with the beautiful girl) I almost couldn't stamp her face on my nails.  I wish the image would had been a little more smaller to accommodate her face better on the nail.  I look forward in seeing more plates like the Stamping Buffet in the future.  I really enjoy them.

What do you think?  Will you be purchasing them?  Let me know in the comment section below!


Happy Stamping! 

The 31 Day Challenge: Day 1 Red Nails

Monday, September 2, 2013

Hola!

The lovely Chalkboard Nails created this fun 31 Day Challenge.  This will be my first nail art challenge.  I hope I can complete it.  Here is her challenge:

La Hermosa Chalkboard Nails ha creado el " The 31 Day Challenge".  Este va ser mi primer reto de unas que yo participo.  Espero poder terminar el reto.  Aqui esta el reto:


Well as you see I am a bit late but I did recently create a red nail mani which I was currently wearing on September 1.  I will include in this challenge as my Day 1:  Red Nails.  Here is the pic I posted on my Instagram:

Como ves estoy un poco tarde pero recientemente hice una manicura de unas rojas, lo cual tuve puesto el primero de septiembre.  Que casualidad, verdad?  Esta manicura sera mi Dia 1 del reto.  Aqui esta mi foto de instagram:


Colors used:

1.  Zoya Chyna
2.  Essie Good As Gold for stamping
3.  Pueen Stamping plate 11

I am really in love with Zoya PixieDust texture polishes.  So are you going to join in the fun!  Its never late to start the challenge! 

Estoy encantada con los PixieDust de Zoya son maravillosas.  Bueno y ustedes van a unirse a este reto del mes de septiembre?  Nunca es tarde si la dicha es buena!  Vamos!

Hasta luego!!


Love Is In The Air

Thursday, August 29, 2013

Hola Amigos!

I hope everyone is doing great!  I was feeling some love in the air and decided to make this mani. 


Ingredients used:

1.  Zoya Lo for the base color.
2.  OPI Minnie Style is the red and white glitter.
3.  Pueen Stamping plate 41
4.  Konad White Polish
5.  Seche Vite

 I hope you enjoy and feel some love in the air too!  :)

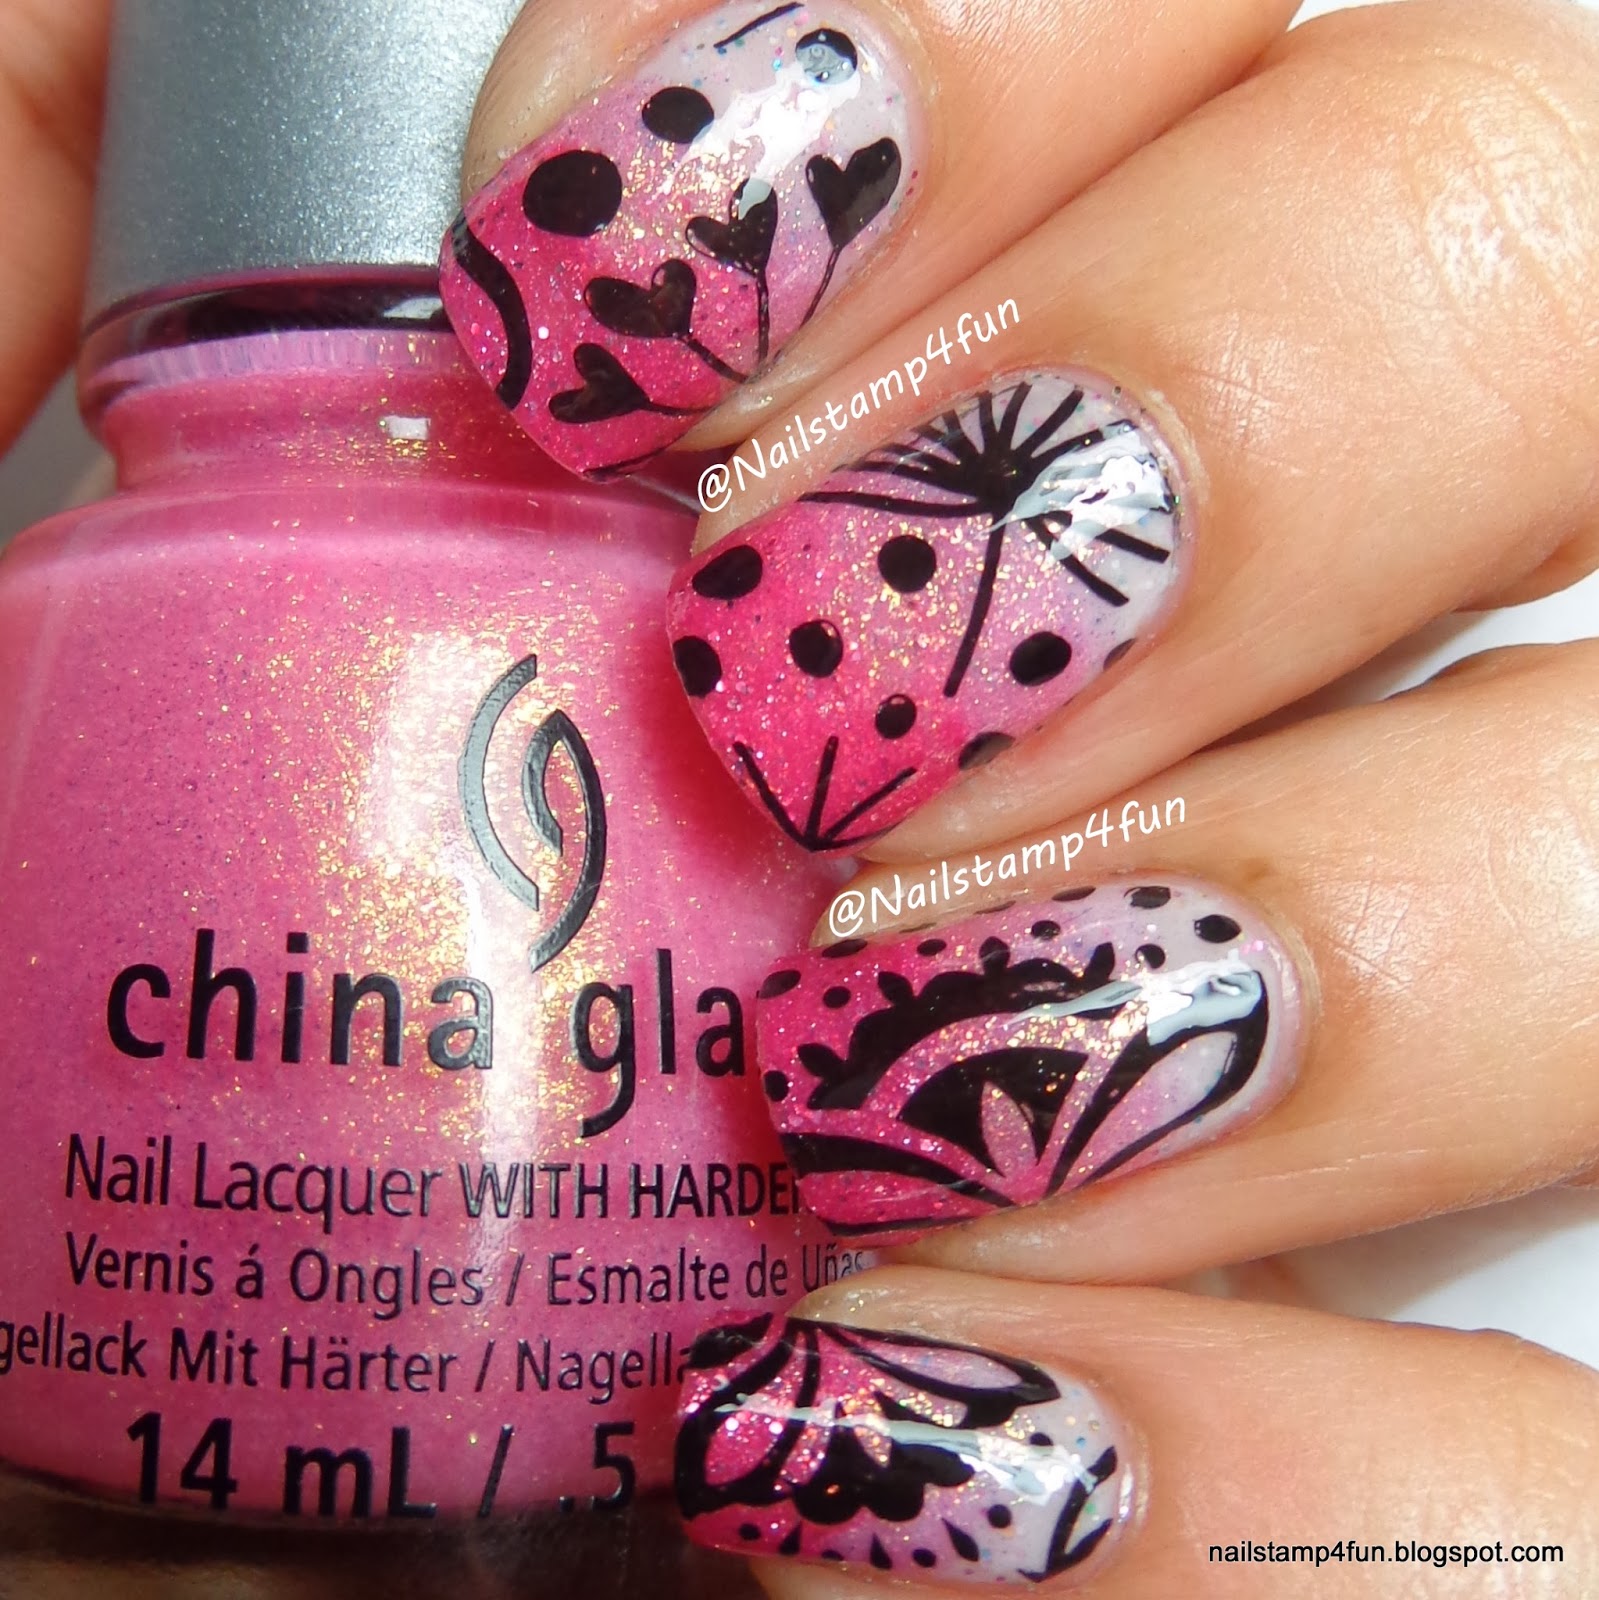
How to achieve Gradient Nails Part 2: I used Texture Polishes & Pueen plate 40

Saturday, July 20, 2013

Hola!

Here is another way to achieve gradient nails without the hassel of using a cometic sponge/wedge.
No special tools necessary just your ordinary nail brush. 

Sometimes it such a pain to clean up after making gradient nails, so I wanted to show you guys another way to do them.  You can also do this method and then use a cosmetic sponge/wedge at the end of the process to give it a more blending effect & less mess! :) 

If you would like to see my post on Gradient Nails using a cosmetic wedge visit here .

Here is the mani I posted yesterday on my Instagram:


Nail products used for this mani are:

1.  Nail Life Gripper Basecoat
2.  Julie G Tangerine Dream, from the Gumdrop Collection
3.  OPI Magazine Cover Mouse, Liquid Sand
4.  OPI Jinx, Liquid Sand
5.  Pueen Stamping plate 40
6.  Stamping Color:  Wet n Wild Black Crème
7.  Seche Vite Top Coat (optional, only if you love a shiny finish)

Steps in achieving a gradient nails:

1.  Apply your favorite Basecoat.
2.  Apply Julie G Tangerine Dream to the upper part of the nail just 1/3 of the nail.  I applied two coats, wait for polish to dry between each coat.
3.  Now apply your second color which is OPI Magazine Cover Mouse to the other 2/3 part of the nail, the middle section.  Two coats.


4.  Then you apply your last color OPI Jinx to the bottom part of the nail.  Two Coats.


5.  Your nails should look like the pic below.  You can reapply in any area that needs to be reapplied. 


6.  Finish it with your favorite stamping design.  I chose Pueen plate 40.


7.  If you wish, you can also apply a topcoat to your texture nails.  I honestly love both looks.


I hope you enjoy my post!!  Which method do you prefer?  Or if you have another method to achieve gradient nails I would love to hear about it. :)

Hasta Luego amigos!

Swanette


How To Achieve Gradient Nails, A Picture Tutorial

Wednesday, July 17, 2013

Hola!


Here is tonights mani!  Its a gradient mani.  The gradient effect is fading two or more colors together on the nail creating a colorful mani.  There are many video showing how to achieve this look.  Its very easy, fun but messy. 


I used:

1.  A makeup Sponge Wedge.  (These are the ones that look like triangles)
2.  China Glaze White on White ( My base color:  applying white will make neons brighter)
3.  China Glaze Sun Worshiper (Color near cuticles)
4.  China Glaze Japanese Koi (Middle color)
5.  China Glaze Pool Party (nail tip color)
6.  Stamping plate Pueen 31
7.  Stamping color Wet n Wild Black Crème.
8.  Nail Life Gripper Base Coat.
9.  Seche Vite Top Coat

Here is my mani:


Steps:

1.  Start with your favorite Base Coat.
2.  Paint all your nails White.  Using white as a undie (base coat) helps neons appear more brighter.
3.  Take you makeup wedge and apply the three colors. 

4. Take the makeup wedge and dab it on your nail.  Pressing very lightly and you will see how the colors blend on your nails.  (For demonstrating purposes I didn't apply the white base here.  I just wanted to show you how to achieve a gradient effect.) 
5.  After you dab your sponge on the nail you should have a gradient effect like below.  I recommend you letting each coat dry and repeat the process until you have reach the desire effect.   Don't be alarm if you are left with an uneven look or maybe slightly rough look, because this will even out when you apply your top coat.


6.  Now you should apply a top coat.  This will help out smooth the nail, blend in the colors better and leave you with great base for your stamping. 

7.  After it dries you apply your stamping and finish off with your top coat! 


I hope you enjoyed my post and try it out too! 

Hasta Luego!

Swanette


Holographic Hearts

Monday, July 1, 2013

Hola! Como estan?  Espero que bien!

Here I have Infra-red from China Glaze Hologlams 2013 Collection.  If you didn't know holographic nail polish are great for stamping, but it can be a little tricky.  The polish tends to dry up faster on the plate so you must hurry and stamp quickly.  It will take practice, but the final result is beautiful. 

Ingredients in this Mani are:

1.  China Glaze Infra-red
2.  Orly Liquid Vinyl
3.  Pueen Stamping plate 41
4.  Seche Vite


Hasta Luego!

P.S.  Sally Beauty Supply has the China Glaze Holograms on Clearance for $5.99.  Always ask is they have any deals on Clearance!  You never know you just might get lucky!

Pink Triangle over Gray nails using Pueen Stamping Plate 20

Thursday, June 27, 2013

Hola!!

Today I was looking thru my stash and found Sinful Colors Slate and realized that I hadn't used it.  Such a beautiful shimmering gray color.  If you look very closely you can see some purple and blue sparkle in it, but it isn't very noticeable on the nail. 

I wanted to try so of my untried plates.  I picked out Pueen 20.  I just love Pueen plates.  You can buy them here , here or here.  I was looking for a color to stamp on it.  I wanted something different and found Sally Hansen Insta-Dri in Fast Fuchsia.  I was amazed on how much this color just pop on the nail!  I really like the combo how about you?

What did I use for this mani???
1.  Base Color:  Sinful Colors Slate
2.  Pueen Stamping plate 20
3.  Stamping Color:  Sally Hansen Insta-dri Fast Fuchsia
4.  Seche Vite

Hasta luego! :)

Pueen Plates 2013 Love Elements

Monday, May 6, 2013

Hola!

When I heard that Pueen Cosmetics where going to launch new stamping plates I was very excited! I knew that I just had to have them.  I have their first Collection Pueen 2013 Sumptuous Gallery and love them.  The majority are all full nail designs which I personally love!   The first Collection has 25 plates but this one has 24 plates.  Each plate measures about 1.8" (5.5 cm in diameter).  Also all Pueen Stamping plates now come with a cute little case for easy storage and great size to carry with you!  The Case is sturdy and comes in different colors.  The plastic sleeves are flimsy, but they do serve their purpose. I wish my first set of Pueen included the small case, but at the time I purchased them they did not include it. Here is the pic of the case:


You can purchase these plates on Pueen Cosmetics site , Amazon here, or Ebay here .  These plates are beautiful.  They are well etched and have a protective backing.  If Pueen continues to make more collections I will continue to buy them! I really love the quality of these plates.  Here are some plates and manicures I have done with this set.

1.  Plate Pueen 49
 
Base Color:  China Glaze Fancy Pants            Base Color:  China Glaze Creative Fantasy
Stamping Color:  Essie Penny Talk           Stamping Color:  Essie Good As Gold


2.  Plate Pueen 44

Base Colors:  Orly Snowcone &  China Glaze
White on White.  Stamping Colors:
 Sally Hansen Blue it & Cherry Red 

        Base Color:  China Glaze White on white
   Stamping color:  Sinful Colors Black on Black
  

3.  Pueen 39


Base Color:  China Glaze Snap My dragon
Stamping Color:  Sinful Black on Black

4. Pueen 28


Base Color:  China Glaze Budding Romance &
China Glaze Graffiti Glitter
Stamping Color:  Sinful colors Black on Black


What do you think?  Will you purchase them?  Let me know in the comments below!

Hasta Luego!


FREE BLOGGER TEMPLATE BY DESIGNER BLOGS