Showing posts with label Stamping Tips. Show all posts

Nail Stamping Tips

Thursday, June 11, 2015

¡Hola!

Nail Stamping is quite difficult at first.  We all go thru it, but I can share some tips I have learn along the way!  I hope these tips are helpful.

Here is my video:


The nail stamper is the most important tool in nail stamping.  It is like finding the love of your life, you might have to go thru a few until you find the one that's right for you!

Remember not everyone like the same type of stamper.  There are different firmness to them:  Squishy, Sticky, firm and Combination.  You really do have to try them out for yourself to figure out which one is right for you.

It's actually fun to try out different stampers and wonderful to have them.  It is important to love your stamper, love the way it feels in your hands and of course love the way it stamps.  There are so many different nail stampers out there today and the majority stamp beautifully.  It just comes down to a personal preference. 

Here are some stampers that work beautifully:

1.  Winstonia Black White Stamper:
Winstonia STore

2.  Born Pretty Store Square Stamper:
Born Pretty Store

3. Magno Nail Stamper *International Seller
Dashica Beauty Shop

4.  Creative Shop Stamper:
International - http://www.drknails.com/product-p/drkbigstamp.htm
 USA - http://www.beautometry.com/category_s/1840.htm
 UK - http://rainbow-connection.co.uk/
 AU - http://www.glittergasm.com.au/

5.  FabUrNails Stampers: *I haven't tried this one, but I heard its good and seen great reviews.
FabUrNails Store

6.  You can also find great cheap stampers at: *Remember to read the reviews/feedback.
www.aliexpress.com
www.ebay.com

How to Prime Your Stamper:

You purchase a new stamper... Now What?!

In the video I gave you some tips.  There are many ways to prime a stamper, these are just the way I have personally done them. 

Tips on Priming your stamper:

1.  First, Don't do anything to the nail stamper.... Try it out first! You might get lucky and no priming is needed.

2.  Wash your stamper with soap and water.  Use regular dishwashing liquid.  Next, try your stamper out!  If it still doesn't stamp, try the next step.

3.  Give your stamper a good massage with a cotton ball saturated with acetone.  I use Pure Acetone.  Don't worry, it will not damage your stamper.  Try it out and if needed repeat the process.  *Most of the time you will get your stamper to work.  Stop here and your stamper is ready to use! Yay!  If not you can go on to the next step, but at your own risk.

4. File your stamper.  Do not use files that are meant for acrylic nails... they will damage your stamper!  Use a natural nail file.  I demonstrated one in the video.  Use the smoothest side.  It's the side you can hardly feel the grit to it.  Be careful with certain nail buffers, some have a harder grit and can damage your stamper.  Take your time to just simply buff your stamper with love.  Remember lightly buff your stamper.  Then try it out.  It should work if done properly. 

5.  I have notice that new stampers don't need to be primed using the filing method.  So repeat steps 2-3 a few times before making the decision to prime with a file.  Filing if not done properly can damage your stamper and leave scratches on your stamper.  Be careful!

How to Stamp?

Everyone stamps differently.  There is no right way nor wrong way in nail stamping.  You just have to figure out which way is the best for you.  In the video I demonstrate different way to stamp, try them all out!

Simple Tips:

1.  Be quick... Very important
In the video I mention you should have all your tools nearby when your stamping, this saves time.  Try to figure out the time it takes to stamp.  Remember every polish is different, each have a different drying time.  Don't stamp near a fan, air conditioner or open window.

2.  Swipe lightly.... not hard. 
Without knowing it you will remove polish from the image making it impossible to pick up your image completely.  This takes a lot of practice, but don't worry you will get it!

3.  Swipe in different directions. 
This can really help if you're having a trouble picking up an image.  Change the direction of your scraper.

4. How to Pick up Image: Push or Roll on. 
Try both ways to figure out which one you like the best!

5.  How to Stamp on the Nail:  Press or Roll. 
I usually like to roll, but to center images I push down on the stamper.  This is another personal preference. Try both ways out!

6.  Have Fun! The most important rule!
Don't get frustrated if something goes wrong, laugh at your mistakes! Keep on practicing because practice makes perfect.  Try new techniques!


I hope you enjoyed my post!  Any tip you will like to add, leave me a comment.  I know many readers will appreciate it!  You're welcome to share tips!


Happy Stamping!
Love, Swanette


Learn how to stamp with two or more colors!

Wednesday, June 4, 2014

Hi!

I want to show you guys how to stamp with two colors.  Here is the mani I posted on my Instagram:


It's very easy to do, just watch my YouTube Video:


What did I use?

1.  Duri Rejuvacote
2.  Zoya Mitzi
3.  China Glaze Modify Me
4.  China Glaze Split Perso-nail-ity
5.  Sally Hansen Silver Sweep
6.  Seche Vite
7.  Black White Stamper
8.  Pueen 28
9.  Pueen 10

Where to purchase Pueen Plates:
http://pueencosmetics.com/ or Amazon or Ebay

I hope you enjoyed my video!

Take Care & Happy Stamping!

Swanette

Let's Talk about Black & White Squishy Stampers!

Thursday, May 15, 2014

¡Hola!

I get so many questions about my B&W Squishy Stampers that I made two videos for you guys!  One where I explain there are many types of B&W Stampers, plus a video on how to prime them.

I personally have four stampers made out of different materials, but they all work great.  When ordering please keep in mind that you might get a different stamper, so its always better to buy a few and or from different sellers.  It never a bad idea to have too many stampers!  When you have a problem with a certain plate just switch and try a different stamper!

Here is the first video where I explain a little about B&W Stampers:


It's easy to prime a stamper!  Don't worry in a matter of minutes you will have a working stamper!  Check this video out!:


I hope you enjoyed my videos!  Have any tips you want to add?  Just add them down below! Its fun to share tips and tricks with everyone!  That's what we are here for to help each other!


Where did I purchase the stampers I mention?

I will list where I purchased them... BUT** Please keep in mind you might receive a different type of stamper.

1 & 2 STAMPERS MENTION: I purchase from SAME Ebay Seller:
http://www.ebay.com/usr/fancyqube?_trksid=p3984.m1439.l2754
3er FAVORITE STAMPER: Aliexpress: **Search for better pricing**
http://www.aliexpress.com/item/Free-Shipping-3sets-lot-DIY-Nail-art-Stamping-Kit-Plated-1-Stamper-2-Scraper-Nail-Art/713462362.html
4th STAMPER:  Winstonia Store:
http://winstoniastore.com/replacement-pad-large-stamp-plastic-scraper-set-3.html

Happy Stamping!

Swanette

Marbling Nail Art Using Your Nail Stamper.

Tuesday, April 8, 2014

¡Hola!

Today I have a new video on YouTube.  I made a tutorial on the mani I posted on Instagram:


I posted this mani on the FB page Adventures in Stamping.  This past Sunday Challenge was using Pastel Colors. 

To apply all the colors I used my nail stamper, yes my nail stamper! :)

I saw a tutorial on Marbling using a plastic sandwich bag, where you apply dots of polish on your nail, then wrap the plastic bag to create a marbling effect... so I decided to apply dots of polish to plastic bag and try to pick up my stamper and it worked out great.  No need for special tools or sponges, just your stamper.

Take a look at my video to learn how:


 I hope you enjoy!

Happy Stamping!


Nail Stamping Tips: Shrinking Your Image

Friday, March 14, 2014

Hola!

Ever look at a nail stamping plate and wonder if the image will fit your nail because its too large?  Well today I will be sharing a simple trick to shrink your image.

First I would like to say that I heard about this technique but never fully understood it until I saw Kelly Cris YouTube video.  Her video isn't in English but she did a great job of showing the technique.  Check out her video here.  Thank you Kelly Cris for sharing!

I hope you guys enjoy the video! Please comment, rate & subscribe.


Happy Stamping!

Swanette

Nail Stamping Tip: Stretching Your Image

Hola!

Today I have a great tip for you!  Its about stretching your image.  Ever look at a nail plate and wonder if that image is too small for your nails?  Well I want to share this tip that will help you enlarge the image so it fits well on the nail.

First I would like to thank Beaching Nails from Youtube for sharing this great technique!  I love her stamping! Go check her out! Click on the links: her Youtube Channel, her Blog, and her Instagram

I hope you enjoy my video!


Happy Stamping!

Swanette

Nail Stamping 101: Video

Monday, March 3, 2014

¡Hola!

If you read my last post, you found out that I finally made a video on YouTube. Yay! They aren't the best quality but hopefully I will make better videos in the future. 

Today I made a Nail Stamping 101 video, showing you the basic in nail stamping.  I really hope you enjoy!

Here is my video:


Happy Stamping!

Swanette

Advance Stamping Tips

Thursday, September 5, 2013

Hola!

I have been getting a lot of request on how I colored in my stamping, so I decided to make this post for you guys!  Remember I am not a professional just a gal who loves stamping.  I want to help you guys achieve beautiful stamping too. 

First of all I learn this technique on Instagram from @maespiritu_artofnail and I credit her completely!  She creates wonderful nail stamping manicures.  This is her Blog where she explain how to achieve Advance Nail Stamping.  Please follow her for nail stamping inspiration.

Here are the steps in achieving the Advance Stamping technique.  Remember to paint all your nails first before doing the following steps:

*Please remember to do these steps per nail. 

Hola, He estado recibiendo muchas peticiónes en como lograr el estampado avanzado, por eso decidí escribir este post. Recuerda que no soy una profesional solo una chica que le encanta el estampado de uñas.  Yo quiero ayudarlos a lograr esta técnica.
 
Primero que nada, quiero decir y dar crédito completamente a una chica maravillosa que conocí en Instagram.  Su nombre y Instagram es @maespiritu_artofnail .  Ella hace un estampado hermoso!  Esta técnica lo aprendí de ella.  Aquí se encuentra su blog de como lograr el estampado avanzado.  Favor de seguirla en su blog y Instagram para más inspiration!
 
Aquí están los pasos de como lograr esta técnica.  Recuerda que debes de pintar todas tus uñas antes de comenzar estos pasos.
 
*Recuerda hacer estos pasos 1 uña a la vez.

Step 1:

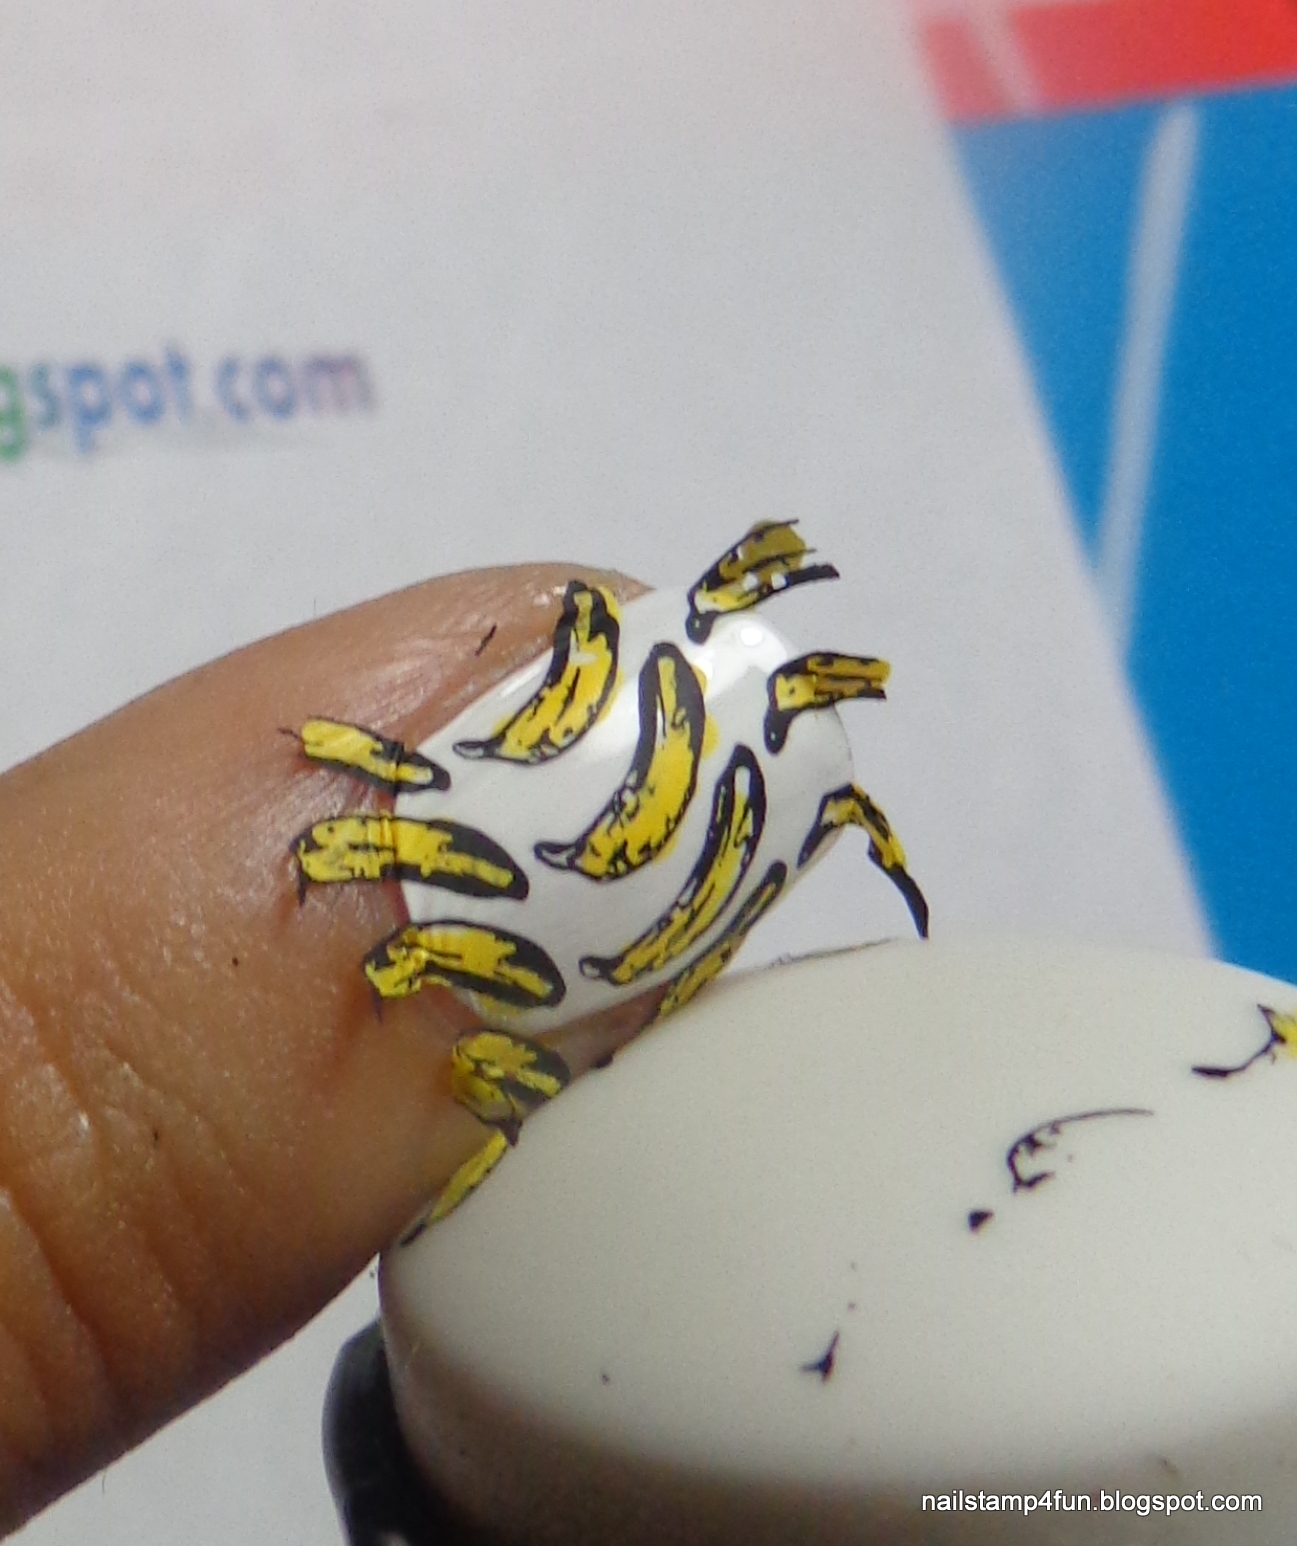
I used Cheeky plate ch42 and chose the banana design.  Not all images work for this technique you need a design that you can fill in with color, just as you would a coloring book.  I used Konad Black special polish.

Paso 1:

Yo use la placa de Cheeky ch42 y para esta demostración use los guineos.  No todas las imágenes funcionan.  Necesitas un imagen que puedas llenar con color.  Usé el esmalte de Konad en negro.

Step 2:

 This is the fun part, time to color in your stamping. I used Sally Hansen lightening and a dotting tool.  In this step you can be creative.  Add the colors you wish, you can even make a banana rainbow!

Paso 2:

Esté paso es super divertido.  Ahora llenas tu imagen de color!  Usé Sally Hansen Lightening y un dotting tool.  Añades los colores que más te gusten.  Puedes crear hasta un arco iris de guineos!

Step 3:

*Please remember to do this steps per nail.  Do not apply the top coat until your ready to apply your stamping.

This is the one of the Tricky parts & most important.   Apply a Top Coat, I used Seche Vite.  This will act like a bond.  Your image will stick to it, BUT you must wait till its tacky.  It cannot be too wet nor dry.  It will take you time to learn when to apply, but you will get it.  Practice makes perfect.

Paso 3:

*Recuerda hacer estos paso 1 uña a la vez.  No apliques la capa final hasta que estés listo para aplicar tu estampado. 

Este paso es un poco complicado pero es el más importante.  Vamos a aplicar una capa final, yo usé Seche Vite.  Esté va actuar como una unión, el que va ayudar pegar tu diseño a la uña.  Debes esperar que el esmalte este un poco pegajosa.  El esmalte no puede estar ni muy mojado ni seco.  Te va tomar tiempo aprender cuando es el momento preciso de aplicar el estampado pero no te preocupes, recuerda que la practica hace la perfección!

 
Step 4:
 
Remember that your nail image on the stamper must be dry and your top coat tacky.  If it is too wet it will smudge and if its too dry you won't be able to stick the image on your nail. 
 
If everything is ready, then here we go! :)
 
 
As you see Below I added a lot of pics.  I am trying to demonstrate to you the way I roll my stamper on my nails.  I roll the stamper very softly on the nail one side to the other.
 

Paso 4:

Recuerda que tu diseño en el estampador deber estar seco y tu capa final debe estar un poco pegajoso.  Ni muy mojado ni seco.  Si esta muy mojado dañas tu diseño y si esta seco no pega.

Ahora si todo esta listo, aquí vamos!

Como verás bajé muchas fotos.  Trato de demostrar la manera en que aplique el estampado.  Tomo el estampador y de un lado a otro aplico el imagen lentamente, es rodar el estampador de un lado a otro.  Recuerda hacer lo lentamente y suavemente.


Step 5:
 
Your nail should look like the picture below.  Using my fingers, I gently press on the images so they apply completely on the nail.  I take off the excess using a small detail brush with acetone.  I use the $1 Elf professional concealer Brush.
 
Paso 5:
 
Tu uña deben lucir como la foto de abajo.  Con tus dedos suavemente presionas el imagen sobre tu uña para se adhiera completamente a el.  El resto lo puedes eliminar con un pincel pequeño con acetona.  Yo uso el pincel de Elf profesional concealer que solamente cuesta un dólar. 


Step 6: Final Step
 
Seal in your design with your favorite Top Coat.  I used Seche Vite top coat. 
 

Paso 6:

Ahora sellas tu diseño con tu capa final favorito.  Yo uso Seche Vite.


And there you go!! You now have a yummy banana nail!  Repeat all these step on each nail. 
 
As you see the Advance Stamping method seems difficult, but remember practice makes perfect!  Never give up! You too can achieve this method!!  Have Fun!!
 
Ahí lo tienes amigos!  Ahora tienes una sabrosas uña de guineos!  Repita todos los pasos para cada uña.
 
Como vez parece difícil este método pero con practica lo lograras!  Nunca deben rendirse!  Espero que hayan disfrutado!
 
 
Hasta luego!


Nail Stamping 101: How to Clean Your Stamper

Saturday, July 6, 2013

Hola! 

I am back with another stamping tip!  This one involves your stamper! 

How To Clean Your Stamper

Before I used Acetone to clean my stamper, especially my Konad stampers.  After I received my Squishy black and white stamper from Ebay I had to find another method.  The Squishy stamper is very sticky.  It attracts dust, hairs and cotton fuzz.  It was a pain to clean.  If I used acetone with the cotton ball or pad it created a mess.  There was cotton fuzz all over the stamper.  So one day I tried tape to see what would happen and... Wepa! ... it clean my stamper with ease!   I have found out that many other nail stampers I know on Instagram used tape too, I guess all great minds think alike!

Using tape is much more easier than using acetone.  You will save money on acetone and cotton balls or pads using this method.  I find that any tape will do the job, so it doesn't have to be expensive.  I found this pink zebra tape roll on clearance for $1 at Walgreens and it works great!


Steps on how to clean your stamper:
 
1.  Take a piece of tape.  Any tape will do the job.  I usually tape it to my desk and leave a long piece so I can gently lift and press my stamper on it without touching it too much with my hands.  I don't want to mess up my mani.  For the pictures I didn't do that but you can also do the following just be careful you don't mess up your nails.  There are many ways you can do this just look for the method that is right for you!


2.  Press the tape on the stamper.  Making sure it is sticking on all the surface of the stamper.


3.  Then just pull the tape away from the stamper.  Sometimes the rubber piece of the stamper comes out, but no worries just put it back in.  Now you have a clean stamper!  Have fun stamping!


I hope you guys enjoyed this stamping tip on how to clean your stamper without the fuss of cotton fuzz sticking on it!


Hasta luego amigos!!


Coloring in your stamping images! An Advance stamping technique.

I am so excited to share this with you guys!
This is so awesome!!

First of all this is not my idea.  I found this awesome nail stamper called @maespiritu_artofnail on Instagram and this is her blog http://artofnail.blogspot.com/ .  She has a wonderful post called Advance Stamping Technique Tutorial that you must read pronto!!  There she teaches you how to color in your stamping designs... just like you would a coloring book. 

I have to admit it took some practicing but you will get it and fall in love with it too!! Here is the mani I did with her technique.

 
Ingredients for my yummy keropi/icecream/ladybug mani!
This was the result of practicing with different images.
 
1.  Base color on all nails:  Ruby Wing Electric Firefly.
2.  Ring finger:  Stamping plate:  QA24. Stamping Colors:  Sinful colors Black on Black, Sinful Colors Irish Green & Sinful Colors Snow me White.
3.  Middle & Ring Finger:  Stamping plate:  Kd7.  Stamping Colors:  OPI San Tan-tonio, Finger paints Model Colour & Nicole by OPI Love Song.
4.  Pinky:  Stamping plate M30.  Stamping color:  Sally Hansen Xtreme Wear Cherry Red.


What do you think about this technique?  Isn't it amazing?  Tell me about it in the comments.
 
 
Hasta Luego!!


Nail Stamping 101: Nail Polishes

Wednesday, March 20, 2013

Hola Stampaholics!

Another question I get on  Instagram @swanettesnails:
What polishes do you used for stamping?

Many people think you need special polishes for stamping, but that's not true.  You can use regular polish for stamping.  That's the wonderful thing about stamping! 

Okay first I want to make it clear that I have never ever used a special stamping polish.  I don't want to mention brands but you get the idea.  So I honestly can't compare and tell you guys the difference between them, but  I can share with you my favorite stamping polishes.  I hope you enjoy!


Black Nail Polish:

1.  Wet n Wild Wild Shine nail color in Black Creme shown here.
2.  Wet n Wild Fast Dry Nail Color in Ebony Hates Chris shown here.
3.  Rimmel Lasting Finish Pro in Black Satin.
4.  Sinful Colors Black on Black.

Here are some Pictures:  

Rimmel in Black Satin & Sinful Colors in Black on Black


 Wet n Wild Black Creme             Rimmel Black Satin            Sinful Colors Black on Black


White Nail Polishes:

1.  Sally Hansen Hard as Nails Xtreme Wear nail color in White On.
2.  Sinful Colors Snow me White. 

Sally Hansen White On & Sinful Colors Snow me White

Sinful Colors Snow Me White            Sally Hansen White On


Metallics:

Alot of Metallics work, but here are the ones I like best.  

1.  Sally Hansen Color Quick Pens.  Chrome Polishes.  I got these on Clearance.  I am not sure if they are still available. 

2.  All of the Essie Metallic Collection Summer 2012 work great with stamping.  They are:  Essie Good As Gold,  Essie No place like Chrome,  Essie Nothing Esle Metals,  Essie Blue Rhapsody &.  Essie Penny Talk
 Sally Hansen Color Quick Pens

 Essie Metallic Collection Summer 2012

Sally Hansen Color Quick Pens          Essie Good As Gold         Essie No place like Chrome


These are my top picks if your starting in Stamping.  You see you don't have to buy special polishes.   You can even find them in your stash too!  Look for polishes that are opaque and thick.  The fun about stamping is experimenting.  

** TIP**  You can also thicken a polish so it becomes opaque and thick for stamping.  Just leave the bottle a little open and check on it to see if it has thicken.  I do this especially with I buy new polishes such as Rimmel Lasting Finish Pro in Black Satin, because when its new it is too thin to stamp with.  I also did this with Sally Hansen Hard As Nails Xtreme Wear in White On & Sinful Colors Black on Black. 

Before you go out and buy new polish remember to look in your stash and try out polishes in your collection and you might find your favorite stamping polish is already there! :)  Have fun! 

You are welcome to add your favorite polishes to stamp with in the comments section below!

Hasta Luego! 


Nail Stamping 101: Step #1

Tuesday, March 19, 2013

Hola Stampaholics!

I hope you all enjoy this series which I will try make for you guys.  It will be all listed under my label called Stamping 101.   Tips on Stamping.   Remember I am not a professional just a gal who loves stamping. 

Step #1 Remove the thin protective plastic off your stamping plate.

This might be the Silliest Step and you may think, "Why the heck would she post this?"  Well guess what? Many people skip this step. This is a very important step.  I wanted to make this step one because many people do not know that this thin plastic even exist.  Many plates that you buy over the internet don't bring instruction manuals so skipping this step can happen.    Heck it even happens to me! lol  Recently I was going to use a plate I bought along time ago but had forgotten to take off the thin plastic.  So here I am trying and trying to stamp and nothing.  I thought that the plate was defective , but when I take a closer look I notice the Clear plastic. lol  It happens to everyone! That is why I am making this post!

Okay back to Step #1 :
Take off the thin annoying pesky protective plastic that covers your plate!

When you receive your plates they come with thin layer of plastic.  Some are blue and some are clear! Yep clear and that's when you forget to take them off! lol  These things are super glued to the plates! ha ha ha  I just take a orange stick and lightly rub on the edge and pull off the plastic film.   It might take time but do it safely some stamping plates are sharp and can cut you. Believe me it hurts!  Here are picture of my stamping plates with the different thin protective plastic on them.  You can see they come in blue and in clear.


Now that you have taken off that annoying pesky film off the plate you may now test them.  I will try to be back as soon as possible with step #2 :)  I hope you enjoyed this silly but important post!

Hasta Luego!

Nail Stamping 101: Stampers & Scrapers

Tuesday, March 5, 2013

Hola!

I get so many questions about stamping on IG so I decided to write about stamping.   I have been stamping for almost 3 years.  I remind you that everything posted is my own opinion and I am not a professional.   I will try my best to help you guys out with stamping.

I want to start with My stampers!  My first Stamper and Scraper is the one pictured below :  Konad Stamp and Scraper.  It had been my favorite for a long long time!  Until I met someone else... lol.  I will explain later.  The clear surface makes it better to see the image.  It picks up images great.  I also use the scraper.  I know many people do not use the scraper, because they say it damages the plates.  It does leave light scratches on the plate but it has never never damage a image print.   For me it has been easier to work with the scraper and the images look way much better, but this is my opinion.  Everyone does what is best for their stamping and plates. The only con has been that polishes have stained my nail stamper. 


Then one day I decided to try the Konad Double Ended Stamper and Scraper pictured below.  As you see its still brand new.  I just couldn't let go of my first stamper.  Don't get me wrong many people love this stamper.  I have used it and it has works great but it was just much more easier for me to use my first stamper. I guess I was already accustom to handling my first stamper.  But overall it does what its suppose to. 


Finally I bought this bad boy!   I bought it on Ebay for $2.29 here is the site.  I have been trying it out for two weeks... and I am in Love! I just couldn't believe that this cheap stamper was going to work!  Its wonderful! I love it so much I just had to order another!  Its super soft and picks up the image great.  You don't have to press hard on the nail the image goes on smooth.  Its molds to your nails.  Its simply wonderful.  And the scraper works great! It leaves no scratches and I think many people would love it.  You should definitely try it out! 


These are all of my stampers and scrapers.  I clean them with 100% acetone. I recommend all of them but if I would have to chose it would be the last one.  I thought I would never leave my Konad stamper for no one! Lol Until I found him! :)  Don't get me wrong I still love my first Konad stamper and scraper and think that its a must for any stamper's collection.

Hasta Luego! :)  Until next time!
 
FREE BLOGGER TEMPLATE BY DESIGNER BLOGS